Sunday, 16 January 2022

UPLOAD.COM for Z80 CP/M - usage

 I feel very honoured to have written a utility which will be distributed as part of the system included with RC2014 kits with CP/M or ROMWBW.


Since upgrading my first RC2014 to CP/M, transferring files has been a bit tricky. My storage medium is a compact flash card, which I can't read with my modern computer system. I can "dd" it to make a backup, which is easy to transfer to a new card. But that doesn't allow me to put a file onto the card, or copy one off using my Mac.

There are methods of reading the CF card on a new system, but I've not made anything work for me. 

My favourite method of transferring my files onto the card is a combination of the DOWNLOAD.COM utility which comes with the CP/M system on the A: drive, and my own utility for creating a .PKG file. That's a hex format that works with the download utility. I've written about that here.  Spencer now provides a web utility which creates the same pkg file. 

The problem

That still leaves me unable to acquire a file that I've created on the RC2014. I tend to develop in Forth and assembly on my modern computer, transferring the files to the RC to run them, so I rarely create files there on the card. But there have been times when I've done so, and it would also be good to selectively back up files from the card rather than making an image of the whole thing.

Spencer asked me to have a go at writing UPLOAD.COM, the partner to DOWNLOAD.COM. I've written about the process of creating the utility separately if you're interested in Z80 programming and the CP/M's BDOS.

Using UPLOAD.COM

Sit UPLOAD.COM in A: alongside DOWNLOAD.COM

Then browse to any drive and use it like this:
A:UPLOAD MYFILE.COM

It is happy for you to give it wildcards in the standard way:
A:UPLOAD MAT?????.COM or 
A:UPLOAD *.* for every file in the directory, as I've done below.
Note that my terminal (minicom) doesn't do wrapping, and it doesn't allow me to select and copy the characters that are off the right-hand side. Those characters seem to be lost. The pkg format doesn't allow for breaks in the stream of hex characters.

The answer to this is to use the capture feature of your terminal program. In the case of minicom it's -C filename.  With that option, everything that comes to the console is also written to the file.
Here is my capture file, after UPLOADing all files in my B: drive. The process happens very quickly, and I was able to make a very convenient backup of every file in every drive on my CF card in a matter of minutes. 
It's very easy to copy and paste any of those files back into CP/M. The first line of the PKG is the instruction to use DOWNLOAD to put the file into the current drive.

UPLOAD.COM for Z80 CP/M - writing the utility

Below is a pkg file. It's easy to see what's going on. Your source file is in hex and padded to the 128-byte boundary. There's a count and checksum at the end. The first line is the instruction to use 'download.com' to put the file into the current directory as the name specified.

I wrote this utility for my Mac some time ago, it allows me to convert any file, paste the result into the Terminal app I'm using to communicate with my RC2014 and have the file copied onto one of the drives.

What has been missing is a way to do the opposite. To grab a file from the RC2014 as the original binary file. I've written about that problem here. The very neat solution would be to have a Z80 program which does this same conversion on the RC2014 and displays a file that you can copy and paste - and either convert back into a binary or store for re-downloading at some later point.

Conveniently, there's an example program in the CP/M Operating System Manual called A Sample File Dump Utility (5.4). This very nearly does what we want. It takes a filename as an argument and dumps that file as hex to the console (formatted neatly with numbering and spaces, which were easy to take out).

It was also easy to add the necessary count and checksum, output A:UPLOAD at the start along with the filename. 

I decided to look up the actual user number, rather than just printing "U0". This is the start of my deep dive into BDOS - a series of operating system calls, documented and available for you to use in your programs. They tend to involve setting up parameters in Z80 registers, setting the C register to the number of the call that you want to make, and then CALLing the base of the BDOS.

I've dabbled in this before, it provides convenient ways to receive keys and output characters to and from the console.

Getting the user number is simple. 

But then we came to parsing the passed argument for wildcards and finding matching files. The example program doesn't do this. It simply OPENs the file that's specified by the user, and if that happens to contain wildcards, the first matching file is opened. 

UPLOAD.COM would be a whole lot more useful if it does pattern matching and spews out all of the matching files. It now does and I've demonstrated this in my guide.

The CP/M documentation isn't bad. It allowed me to discover that you can pass a filename to a 'first' and 'next' functions (17 and 18) which give you the first and subsequent matches for your filename which contains ? or *.

I learned that the system has a 128-character buffer at a known location, which is used for passing results for certain functions. For filenames It's divided into 4 32-byte buffers and you get a number 0-3 in A which you shift-multiply by 32 and add to the base address of the buffer for the result you need.

After calling the 'first match' function, you have to call the 'next match' immediately, and then again, as long as you receive a valid result. (You can use this same process without checking whether your filename contains wildcard characters. If it doesn't, then 'first match' just returns your file, and 'next' will return 255 meaning 'no more results').

It would seem sensible to use the 'first' and 'next' system at the start and make an array of matching filenames. Instead I chose to do something less efficient, but that I thought was simpler to write, which is a 'get_nth_match' function, which passes the original filename to 'first' and then calls 'next' the appropriate number of times.

UPLOAD.COM is available here and included alongside download.com with the CF cards that you can buy for your RC2014.


Thursday, 6 January 2022

Creating a custom template for custom cards in Dendrite

As is sometimes the case, I'm writing this post primarily for my own future reference.

Dendrite is a development environment that allows you to work with tokens for commonly-used blocks of text when hand-coding a site. Further to that, it gives you simple dialogs for special blocks with structured text and images, known as 'cards'. 

It allows me to paste an image and fill in a few fields when I add stories to a page like the one above, this is a newsletter I manage.

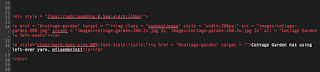
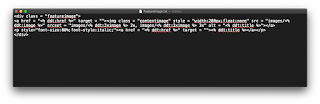
There's a block of code near the top of this page, which generates a feature image. This is the code:
It's an image (with 2x and 3x versions) with a caption, all within a div which is floating right.

Each month for some years I've created the resized images and edited this code manually, because that's less effort than remembering how to set up a new template for a custom card in Dendrite. 

So today I've gone to the trouble, and have also gone to the trouble of documenting it here for you and for myself.

This text only appears once on the page, but the real benefit is being able to use the 'insert card' dialog to paste the image and write the caption.  Turning multiple fiddly copy-and-paste operations into a few slick and mindless strokes.

So here's the procedure. You're welcome, future-me.

Adding a new template to a Dendrite website

First copy one of the existing default templates, found in <website folder>/Templates. (use 'News' because that one uses all of the tokens, which will serve as a temporary reference). Change its name to something memorable (In this case, FeatureImage.txt) 
A template file consists of the code for that card, with dendrite-style tokens inserted where information from the card dialog is to appear. The example above should be self-explanatory.

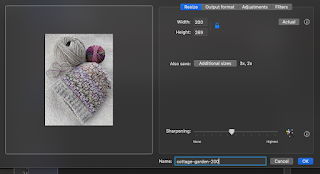
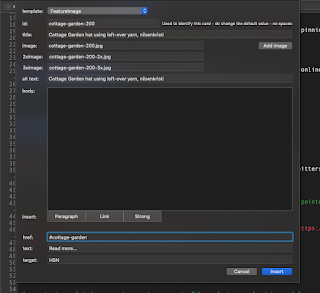
With that in place, Insert Card in Dendrite offers this dialog, which you can use to fill in the information, and Add Image allows you to paste the image (past it once, Dendrite can create the 2x and 3x versions. All you have to do is give it a base name, which also serves as the id for this particular object.)


I use a keystroke to grab a roughly-square image to the clipboard. A paste into the image well in the dialog above crops it to the selected proportions and resizes it with 2x and 3x versions. It's a remarkably efficient way to add 'cards' containing images to a hand-coded web page. (Note that in this example, my new template doesn't use the body, the link text or the link target. So those can be ignored when filling in this card.)

Important things to remember

  • Remember to select your new template before OKing this card dialog (the drop-down button at the very top of the Insert Card dialog.) I think it defaults to 'News' rather than the last one you chose. 
  • If you use a different image format (as I do here, 200w and locked proportions rather than 150x150 for the regular news stories) remember to make sure those settings are right for this special card and future regular ones.


Saturday, 18 December 2021

Dimming an RGB lightstrip using a Tiny2040 (Pi Pico)

 This is just a simple experimental project to try out Pimoroni's Tiny2040 for the first time.


In order to dim LEDs we have to use PWM; change the duty cycle of a square wave. The 2040 chip handles this and so this program is really simple, it just sets up PWM on one pin and handles two inputs, one for brighter, one for dimmer. 

The harder part was controlling 12v LED strip using a 3.3v output. I've used a small transistor to amplify to 5V and then a mosfet to step that up to 12v. A 7805 gives us a 5v supply to power the microcontroller and to use in the amplification circuit.

It would be possible to generate three square waves with independent duty cycles, and thus have smooth colour changing with the RGB LEDs.

Friday, 17 December 2021

PicoTerm, terminal application for Raspberry Pi Pico, supported escape codes and user-definable characters

PicoTerm is an application for the Pi Pico which provides a serial terminal with VGA output and USB keyboard input.


It was developed for the RC2014 and therefore is configured for that computer; eg 115,200 baud and the RC2014 logo at startup. However, if you'd like a custom version, please get in touch.

The Pico has resources that allow for a 640*480 output with a character mode, or 320x240 with full  32,000 colour.

I've recently added support for uploading user-defined character data. I've made this page in order to document the escape codes currently supported, along with information about the new UD character functionality.

Here is the list of supported escape codes, followed by the information about defining characters.

  • \ESC[?25l | Cursor invisible
  • \ESC[?25h | Cursor visible
  • \ESC[H | Move to 0-0
  • \ESC[s | Save the cursor position
  • \ESC[u | Move cursor to previously saved position
  • \ESC[-Row-;-Col-H | Move to -Row-,-Col-
  • \ESC[0K | Clear from cursor to the end of the line
  • \ESC[1K | Clear from the beginning of the current line to the cursor
  • \ESC[2K | Clear the whole line
  • \ESC[2J | Clear the screen and move the cursor to 0-0
  • \ESC[-n-A | Move the cursor up -n- lines
  • \ESC[-n-B | Move the cursor down -n- lines
  • \ESC[-n-C | Move the cursor forward -n- characters
  • \ESC[-n-D | Move the cursor backward -n- characters
  • \ESC[0m | normal text (should also set foreground & background colours to normal)
  • \ESC[7m | reverse text
  • \ESC[0J | clear screen from cursor
  • \ESC[1J | clear screen to cursor
  • \ESC[3J | same as \ESC[2J
  • \ESC[nS | scroll whole page up by n rows (default 1 if n missing)

40 col colour only: (sequence is ignored, no effect in 80 col b/w)

  • \ESC[38;5-n-m | Set foreground colour to -n- (0-255)
  • \ESC[48;5;-n-m | Set background colour to -n- (0-255)
  • \ESC[38;2;r;g;bm | Set foreground colour to r/g/b (values 0-255, scaled by picoterm to 0-31 to give 32,000 colours)
  • \ESC[48;2;r;g;bm | Set background colour to r/g/b (values 0-255, scaled by picoterm to 0-31 to give 32,000 colours)
80-col textmode version only: (from version 1.1)
  • \ESC[1L | Insert line at cursor position, scrolling down from the cursor's row
  • \ESC[1M | Delete line at cursor position, scrolling up to the cursor's row

User-definable characters

C/PM (which is widely used on the RC2014) uses 7-bit ascii characters, which means that there are 128 characters (128-255 inclusive) unused and available for defining by the user. In the case of the colourmode  version of Picoterm, the character data is simply stored as pixel data (foreground colour/background colour, 8 bytes per character) and drawn to the screen when needed, which means that the 'reverse graphics' doesn't rely on those reverse characters being defined, and therefore works on the default fixed characters and any that you define.

Note that this functionality is present in picoterm colour v0.2.0 onwards, which is available here.

  • \ESC[?-n-U | followed by 8 bytes, which will be inserted into the user-defined character space for character n (n can be 128-255 inclusive)

When displaying custom characters, the current foreground and background colours apply, these being reversed if reversed graphics is on.


Here is the simple basic program used in the screenshot above to display pacman: (yes, it's possible to use a loop to define the four characters, but beware of MS Basic's tendency to add a space when using STR$. It's expanded here for readability.)

10 PRINT CHR$(27);"[?128U";

20 FOR C=1TO8

30 READ A

40 PRINT CHR$(A);

50 NEXT C


60 PRINT CHR$(27);"[?129U";

70 FOR C=1TO8

80 READ A

90 PRINT CHR$(A);

100 NEXT C


110 PRINT CHR$(27);"[?130U";

120 FOR C=1TO8

130 READ A

140 PRINT CHR$(A);

150 NEXT C


160 PRINT CHR$(27);"[?131U";

170 FOR C=1TO8

180 READ A

190 PRINT CHR$(A);

200 NEXT C


205 PRINT CHR$(27);"[38;5;11m";

210 PRINT CHR$(128);CHR$(129)

220 PRINT CHR$(130);CHR$(131)


230 END


1000 DATA 15,63,127,127,255,252,224,252

1010 DATA 0,192, 224,224,128,0,0,0

1020 DATA 255,127,127,63,15,0,0,0 

1030 DATA 128,224,224,192,0,0,0,0


Thursday, 9 December 2021

Inconsistent results with Integrity

 Running the existing release alongside a potential new release is a great sanity check to make sure that any new changes haven't had any undesirable effects on the results.

Today this happened (the new Integrity Pro and existing release are showing different results):

It was a head scratcher and I had to sort the sitemap tables and carefully compare them to find the differences.

The reason is that I'd put some A/B testing in place, there are a bunch of pages with differences and A or B in the querystring. It's in an area of the site I'd normally ignore for reasons, but didn't today.

Therefore, the list of pages may feature both the A version and the B version (because the url of the page is the unique key for Integrity). So those pages may be duplicated in the results, or maybe not, and that's a matter of chance. 

Ignoring querystrings fixed the problem, and now gives consistent results every time. (Querystrings aren't used for any other reason on this site, so it's fine to ignore them).

Electronic Dice with the Pi Pico

This was my first project with the Pi Pico. It's a 'Hello World' for hardware/software.


The real reason for two buttons is that I already had the box drilled and fitted with the two buttons for a different project. It made sense to switch the power using an arcade button, because it's automatically switched off when you let go of it. The second button grounds the 'run' of the Pico, which means that it performs the shuffle and display once more. In reality, just the one power button would do, because letting go of that and pressing it again does the same thing as the 'run again' button.

I wrote the software in Micropython because this was my introduction to the Pico. More recent projects use C which suits me much better.


* That should probably be electronic die, because one die is shuffled and displayed. The pico has enough pins to shuffle and display 3 dice, and probably many more with a bit of logic to decode the binary numbers 0-6 (3 GPIO pins) to 7 LEDs.