Sunday, 6 March 2022

Minstrel the 4th is a modern recreation of the Jupiter Ace, a lesser-known home computer from 1982. It's notable for its use of Forth rather than BASIC which was common at the time.

The Ace had a ZX Spectrum-like rubber keyboard. The Minstrel's is an improvement but its small tactile switches don't really allow for fast typing.

The Minstrel and similar computer scan the keyboard by reading a group of hardware ports which correspond with half-rows of the keyboard. They expose the bus as an expansion port, so it's possible to intercept those port reads. Here's my working prototype, it uses quite a bit of logic. The Pico's main job is to act as a USB host and allow a modern keyboard to be plugged into its own micro-USB port. and maps the keypresses it receives to the appropriate rows and columns of the Minstrel's keyboard matrix.

It's not only the size and arrangement of the keys that limit typing speed, but the fact that the keyboard matrix is scanned every 1/50th second and then not buffered. So even with modern key switches, this makes typing on computers like the Ace, ZX81 and Spectrum is a bit of a plod. It's easy for the Pico to buffer the keyboard input, and present it to the Minstrel one key at a time, at a speed that it can handle.

This also opens up the possibility of connecting a serial terminal to the device to allow listings to be pasted to the Minstrel. It also means that anything you type using a USB keyboard can be echoed to the terminal giving you a paper tape of  In the top picture you can see that the finished product has a USB-FTDI adaptor attached for this purpose.

My interface is now in production in small batches, please contact me for details.

Monday, 28 February 2022

Integrity v12 launched

You may already know that we spent a chunk of last year bringing Integrity's engine up-to-date. You can read the reasons for this in an earlier post:

https://blog.peacockmedia.software/2021/08/the-future-for-integrity-and-scrutiny.html

In the new year, this was released in the form of Integrity Pro 12 beta which was free and unrestricted. Jan and Feb have seen gradual fixes and improvements to that and this week v12 has quietly become the general release (with v10 also available and supported for a while as a safety net).


In case you're not familiar with the range, Integrity is a link checker, it's free and no-frills.

Integrity Plus allows you to manage settings for multiple sites, adds xml sitemap functionality, csv exporting and search box / filter button.

Integrity Pro adds many of Scrutiny's features; a SEO table, HTML validation table and spell-checking.

If you already hold a licence for Plus or Pro then that key will work with version 12, it's free for you. If you'd like to go from Plus to Pro then there's a lose-nothing upgrade, and also from Plus or Pro to Scrutiny.

(Note that if you're moving from v10 Integrity Plus to v12, or from Plus to Pro, this will be useful.)

If you're a blogger or journalist, I've updated the Press Materials to include the new icons.

Scrutiny 12

Scrutiny 12 is very much in progress. As with Integrity, there will be a revision of the pricing, and again, there'll be no fee for existing licence holders (v7 onwards). (Hint: now is a good time to buy or upgrade).

One big question: Scrutiny moved to a very different layout at version 5, which wasn't a popular decision, people liked the more open-plan tabbed layout of Integrity and the classic Scrutiny.  Should we return Scrutiny to that look?  Your opinion on this would be gratefully received.


Tuesday, 22 February 2022

This is a quick help document showing how to transfer website configurations between Integrity Plus, Integrity Pro or Scrutiny.

For legacy reasons*, you may also need to do this if you're moving from the web download of Integrity Plus (non-App Store version) to the new v12 Integrity Plus.

First of all, run the new version to see whether this applies to you. You may see the websites that you set up in your previous version. If you don't, then read on.


This is simply an export / import. 

Using version 10 of Integrity Plus, File > Export > Settings > All websites

Integrity will save a .lcsbatch file. Choose a location and confirm.
Using the new version 12, File > Open... and choose the file that you just saved.


*Previously, the web downloads of Integrity Plus and Pro were not sandboxed, while the app store versions were sandboxed. Also, the web download and App Store versions of Integrity Plus had different bundle id's (meaning MacOS will see them as different apps). 

Version 12 corrects these inconsistencies, but means that the new Integrity Plus can't 'see' the location where the previous version stored its data, making an automatic import impossible.

Wednesday, 16 February 2022

In simple terms, the best settings for Integrity and Scrutiny

The default settings for Integrity, Integrity Plus, Integrity Pro and Scrutiny have been tweaked over 15 years. Generally speaking, they will be the best settings and the most likely* to perform a successful, full  and useful scan.

The very short version of this post is: go with the defaults, and only adjust them if you understand and want to use an additional feature, or if you have a problem that may be cured by making a change. Please contact support if you're unsure about anything. 


The rest of this post gives a very basic 'layman' explanation of the site-specific options and settings. 

In version 12 (in beta as I write this) these settings have been rearranged and grouped into a more logical order. They're listed below as they are grouped in version 12.


Options

These are optional features. In general, only enable them (or change the default) if you understand what they mean and are prepared to troubleshoot if the option causes unexpected results.


  • This page only:  Simple - sometimes you may want to scan a single page. If you want to scan an entire site, leave this switched off.
  • Check linked js and css files:  This will drill more deeply into the site. If you're looking for a straightforward link check, leave this off.
  • Check for broken images:  Finding broken images is probably as important as finding broken links, leave this on
  • Check lazyload images/load images:  It's possible that your site uses lazyloading of images. If you know that it does then you may want to enable this. NB there is no standard for lazyloading images. Integrity will try to find the image urls in a couple of likely places, but this option can lead to false positives or duplication. Be prepared for troubleshooting.
  • Check anchors:  An anchor link takes you, not just to a page, but to a specific point on a page. With this option on, Integrity will check that the anchor point exists on the target page. If you know that your site uses this type of link, and you want to test them, enable this option.
  • Flag missing link url:  Sometimes during development, you'll create links with empty targets, or use # as a placeholder. This is a way to find those 'unfinished' links.


Advanced

Here we have the controls that may sometimes need to be altered to 'tune' Integrity to your site. In general, the default values should work, only change them if you have a reason.


  • User-agent string:  The default values should work almost all of the time. If the user-agent string is how Integrity identifies itself. If this is set to that of a real browser (which is now the default value) then that should be fine. (Occasionally a site will give different pages for a mobile browser / desktop browser. Or to Googlebot.) 
  • Accept language:  can be used to check specific language pages of a multilingual site.
  • Timeouts and delays:  Use the defaults. If you have problems with timeouts or certain errors then it may be necessary to adjust these settings.


Site characteristics 

Here are a few settings which may need to be adjusted for your particular site. Again, the defaults should be fine, but refer to this guide or ask for help if you have problems.


  • Ignore querystrings: This is the option that is most likely to need changing to suit your particular site. The default is off and that'll probably be fine. However sometimes a session id or other things can be included in the querystring (the part after the ? in a url.) and sometimes these can cause loops or duplications. In that case the setting should be on.  On the flip side, sometimes important information can be included in the querystring, such as a page id, and so for those sites you definitely need the setting to be off.
  • Page urls have no file extension (more recently renamed 'Starting url has page name without file extension'): The explanation of what this box actually does is lengthy and it's more than likely that you don't need it switched on.  In the case where it's required, Integrity should recognise this and ask you an explicit question, and set this box accordingly.
  • Ignore trailing slash: It's very unlikely that this needs to be switched off (default is on). It has become less important in version 12 because its inner workings are slightly different.


If you're using version 10 or earlier, then you'll have the option to Check links on error pages.  I strongly advise leaving this switched off, as it's pretty likely to cause problems or confusion. v12 doesn't have the option. 

If you have a custom error page (which is likely to be one page) and want to test the links on it, then test it separately by setting up a single-page configuration to a non-existent url (such as mysite.com/xyzabc) 


Rules

If you have a specific problem, then you can sometimes cure that with a targeted 'ignore' or 'don't check' rule.  

The other very useful use for rules is to either ignore an entire section of a site, or to limit the crawl to a specific part of a site.


*It may not seem that way if yours is one of the sites that needs a change from default settings, but that's probability for you.  In practice, only the querystring setting is an unpredictable 'it depends' setting. Go with the default, contact support if you need help.


Monday, 31 January 2022

Locate : an overlooked feature in Integrity and Scrutiny

 The Locate feature is an overlooked feature in Integrity and Scrutiny. It answers the common question, "Integrity is reporting a broken link on a page but I don't know where to find that page" or "that page shouldn't exist any more".

It tells you, as a user, how to find the link in question and the page it's on. These hyperlinks are clickable.


There may be more than one route to click through from the home page (or your starting url) to the link in question, but this tool should show the shortest.

It's important to distinguish here between link urls, and a single instance of a link.

In this example, I've selected a link url which has tested as good. There may be links with that target url on multiple pages (or multiple links on the same page). For example a link to the home page probably exists on every page of a site, maybe in more than one place on a page.


A context menu* triggered by a right-click or control-click on that url row will only show options that are relevant to that url, or the page at that url. In order to access the Locate feature, you need to right-click one of the link instances, which are revealed when you expand the row.

The By page and By status views both show link instances when the page / status is expanded, so Locate can be accessed in those views after expanding a page/status. All Links is a flat table showing link instances, so Locate will appear when you right-click any row. In all of these cases it's important to only select a single row, Locate can't work on multiple selected items.

Similarly, if you open the link inspector, it concerns a link url and the status of that url when tested, and it has a table listing the instances or occurrences of that url in links. Before using the Locate button (or context menu in that table) it's important to select one of the instances in the table.


Recent versions of Integrity and Scrutiny may have Locate in these context menus but it may not appear to do anything. This is fixed in Integrity and Scrutiny v10.4.12+


Sunday, 16 January 2022

UPLOAD.COM for Z80 CP/M - usage

 I feel very honoured to have written a utility which will be distributed as part of the system included with RC2014 kits with CP/M or ROMWBW.


Since upgrading my first RC2014 to CP/M, transferring files has been a bit tricky. My storage medium is a compact flash card, which I can't read with my modern computer system. I can "dd" it to make a backup, which is easy to transfer to a new card. But that doesn't allow me to put a file onto the card, or copy one off using my Mac.

There are methods of reading the CF card on a new system, but I've not made anything work for me. 

My favourite method of transferring my files onto the card is a combination of the DOWNLOAD.COM utility which comes with the CP/M system on the A: drive, and my own utility for creating a .PKG file. That's a hex format that works with the download utility. I've written about that here.  Spencer now provides a web utility which creates the same pkg file. 

The problem

That still leaves me unable to acquire a file that I've created on the RC2014. I tend to develop in Forth and assembly on my modern computer, transferring the files to the RC to run them, so I rarely create files there on the card. But there have been times when I've done so, and it would also be good to selectively back up files from the card rather than making an image of the whole thing.

Spencer asked me to have a go at writing UPLOAD.COM, the partner to DOWNLOAD.COM. I've written about the process of creating the utility separately if you're interested in Z80 programming and the CP/M's BDOS.

Using UPLOAD.COM

Sit UPLOAD.COM in A: alongside DOWNLOAD.COM

Then browse to any drive and use it like this:
A:UPLOAD MYFILE.COM

It is happy for you to give it wildcards in the standard way:
A:UPLOAD MAT?????.COM or 
A:UPLOAD *.* for every file in the directory, as I've done below.
Note that my terminal (minicom) doesn't do wrapping, and it doesn't allow me to select and copy the characters that are off the right-hand side. Those characters seem to be lost. The pkg format doesn't allow for breaks in the stream of hex characters.

The answer to this is to use the capture feature of your terminal program. In the case of minicom it's -C filename.  With that option, everything that comes to the console is also written to the file.
Here is my capture file, after UPLOADing all files in my B: drive. The process happens very quickly, and I was able to make a very convenient backup of every file in every drive on my CF card in a matter of minutes. 
It's very easy to copy and paste any of those files back into CP/M. The first line of the PKG is the instruction to use DOWNLOAD to put the file into the current drive.

UPLOAD.COM for Z80 CP/M - writing the utility

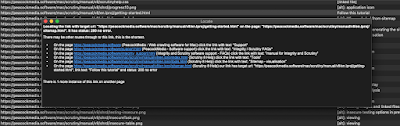
Below is a pkg file. It's easy to see what's going on. Your source file is in hex and padded to the 128-byte boundary. There's a count and checksum at the end. The first line is the instruction to use 'download.com' to put the file into the current directory as the name specified.

I wrote this utility for my Mac some time ago, it allows me to convert any file, paste the result into the Terminal app I'm using to communicate with my RC2014 and have the file copied onto one of the drives.

What has been missing is a way to do the opposite. To grab a file from the RC2014 as the original binary file. I've written about that problem here. The very neat solution would be to have a Z80 program which does this same conversion on the RC2014 and displays a file that you can copy and paste - and either convert back into a binary or store for re-downloading at some later point.

Conveniently, there's an example program in the CP/M Operating System Manual called A Sample File Dump Utility (5.4). This very nearly does what we want. It takes a filename as an argument and dumps that file as hex to the console (formatted neatly with numbering and spaces, which were easy to take out).

It was also easy to add the necessary count and checksum, output A:UPLOAD at the start along with the filename. 

I decided to look up the actual user number, rather than just printing "U0". This is the start of my deep dive into BDOS - a series of operating system calls, documented and available for you to use in your programs. They tend to involve setting up parameters in Z80 registers, setting the C register to the number of the call that you want to make, and then CALLing the base of the BDOS.

I've dabbled in this before, it provides convenient ways to receive keys and output characters to and from the console.

Getting the user number is simple. 

But then we came to parsing the passed argument for wildcards and finding matching files. The example program doesn't do this. It simply OPENs the file that's specified by the user, and if that happens to contain wildcards, the first matching file is opened. 

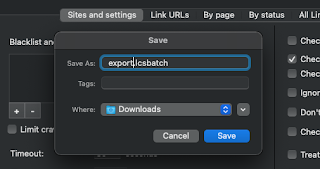
UPLOAD.COM would be a whole lot more useful if it does pattern matching and spews out all of the matching files. It now does and I've demonstrated this in my guide.

The CP/M documentation isn't bad. It allowed me to discover that you can pass a filename to a 'first' and 'next' functions (17 and 18) which give you the first and subsequent matches for your filename which contains ? or *.

I learned that the system has a 128-character buffer at a known location, which is used for passing results for certain functions. For filenames It's divided into 4 32-byte buffers and you get a number 0-3 in A which you shift-multiply by 32 and add to the base address of the buffer for the result you need.

After calling the 'first match' function, you have to call the 'next match' immediately, and then again, as long as you receive a valid result. (You can use this same process without checking whether your filename contains wildcard characters. If it doesn't, then 'first match' just returns your file, and 'next' will return 255 meaning 'no more results').

It would seem sensible to use the 'first' and 'next' system at the start and make an array of matching filenames. Instead I chose to do something less efficient, but that I thought was simpler to write, which is a 'get_nth_match' function, which passes the original filename to 'first' and then calls 'next' the appropriate number of times.

UPLOAD.COM is available here and included alongside download.com with the CF cards that you can buy for your RC2014.